No startup founder wakes up thinking "Today I'll build something nobody wants."
Yet here we are – 35% of startups that fail end up finding there wasn’t a real market demand.
What goes wrong? Teams build first and validate later.
Yes, great products aren't built on great ideas, they're built on great validation.
After working with 50+ startups, we've distilled our hard-won lessons into a systematic approach that saves months of wasted effort.
Let’s take you through our exact workflow ⬇️
🎯 How this guide works
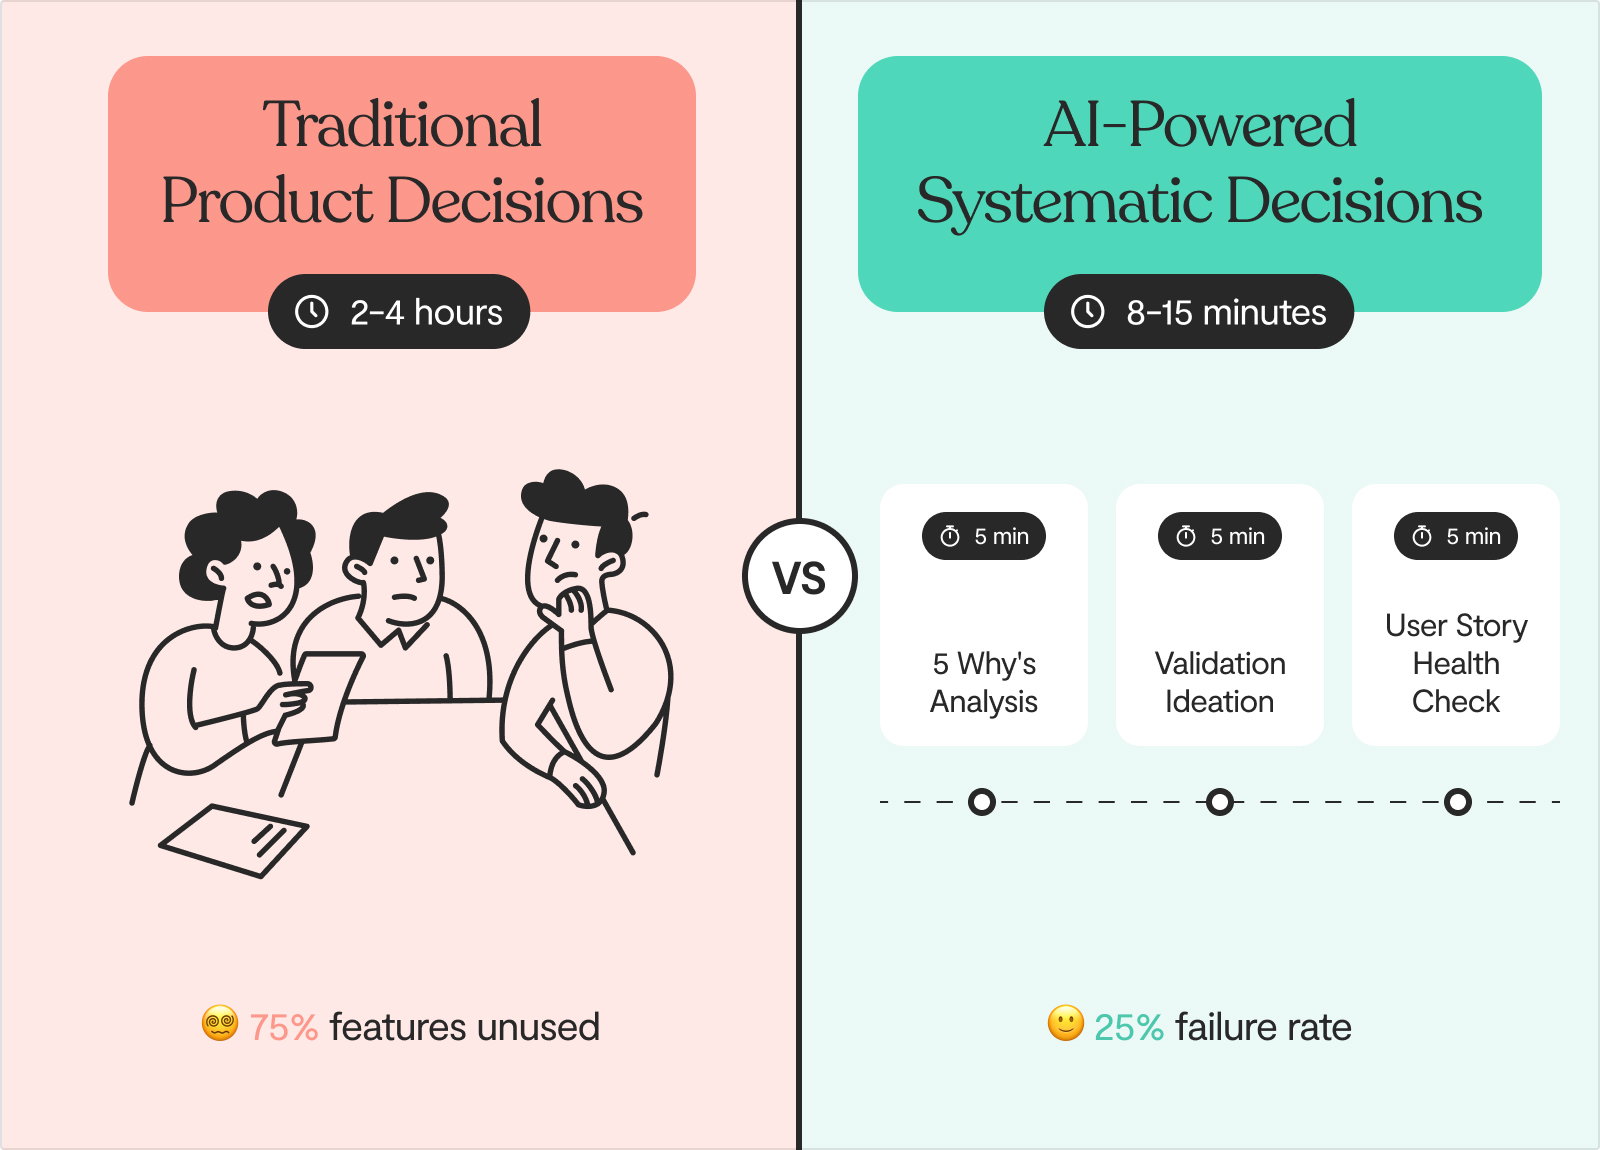
All three AI tools mentioned in this guide are completely free to use. Head to our AI Tools page to access the 5 Why's Analysis, Validation Ideation, and User Story Health Check tools. No credit card needed – just open them in separate tabs and you're ready to go.
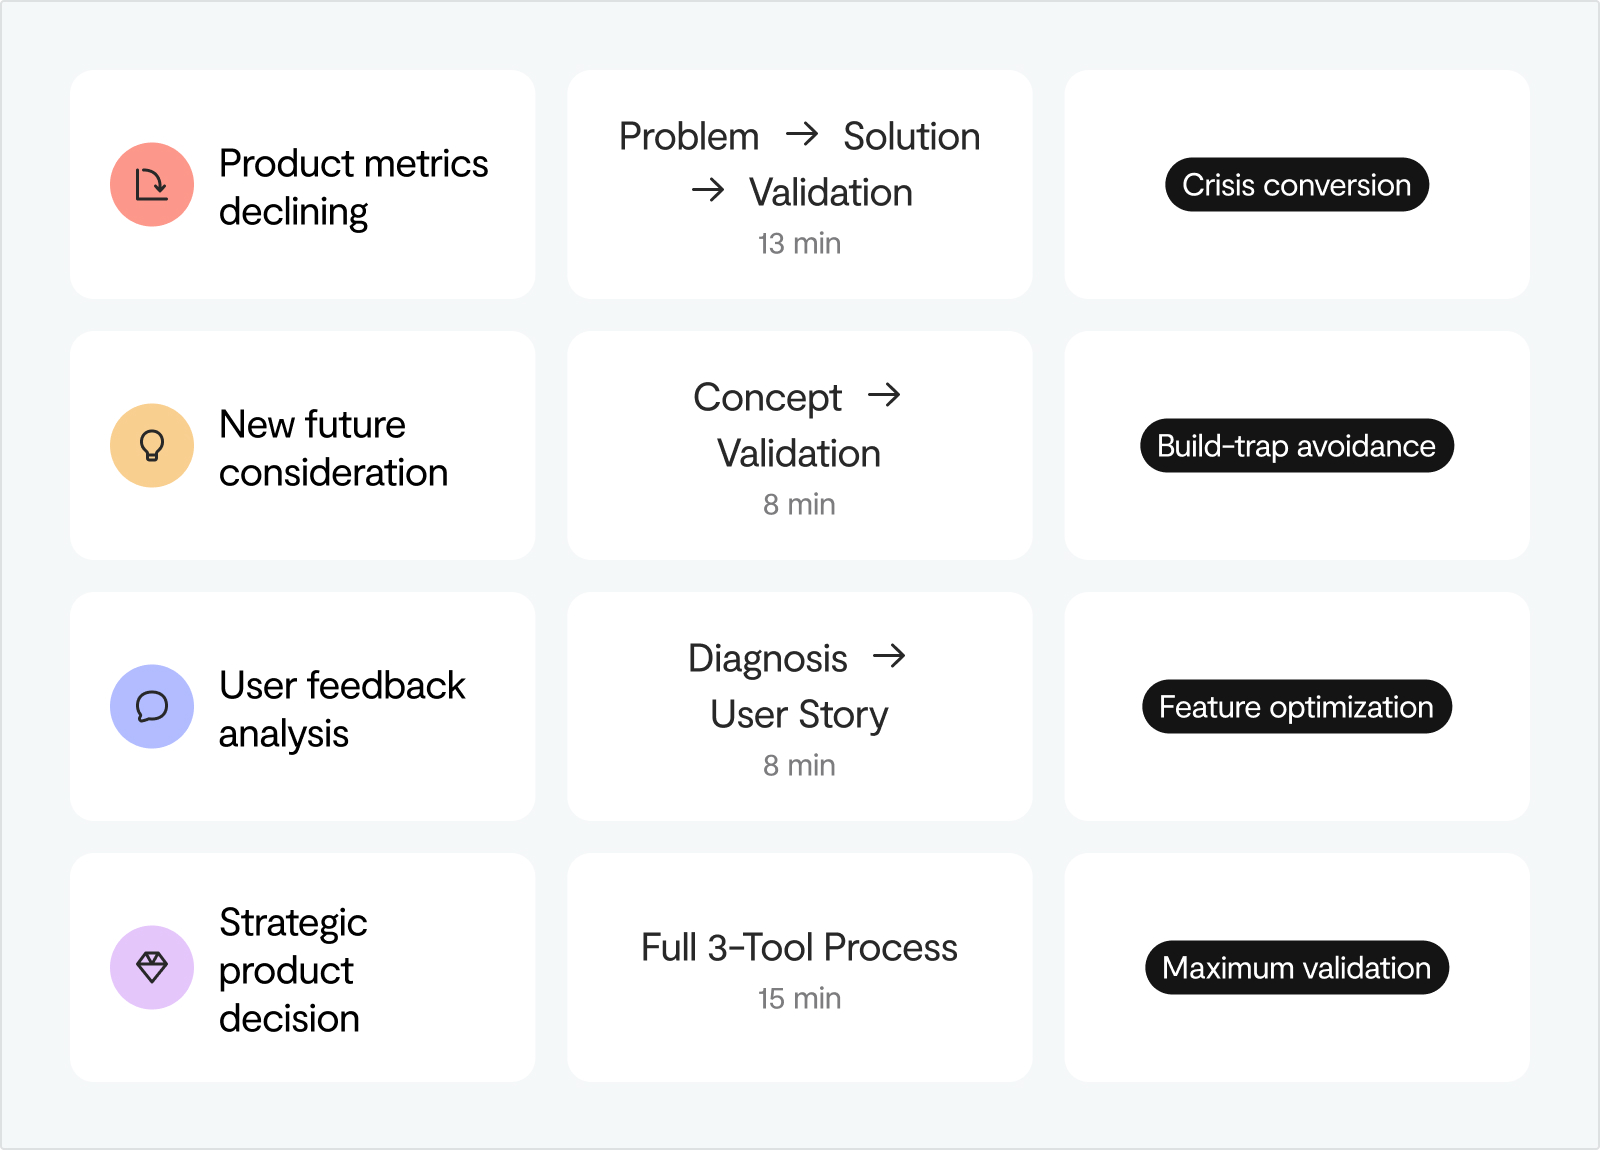
We've taken the decision-making process we use with our startup clients and distilled it into four battle-tested workflows. Each one combines our 3 AI tools strategically to eliminate guesswork and reduce product risk.
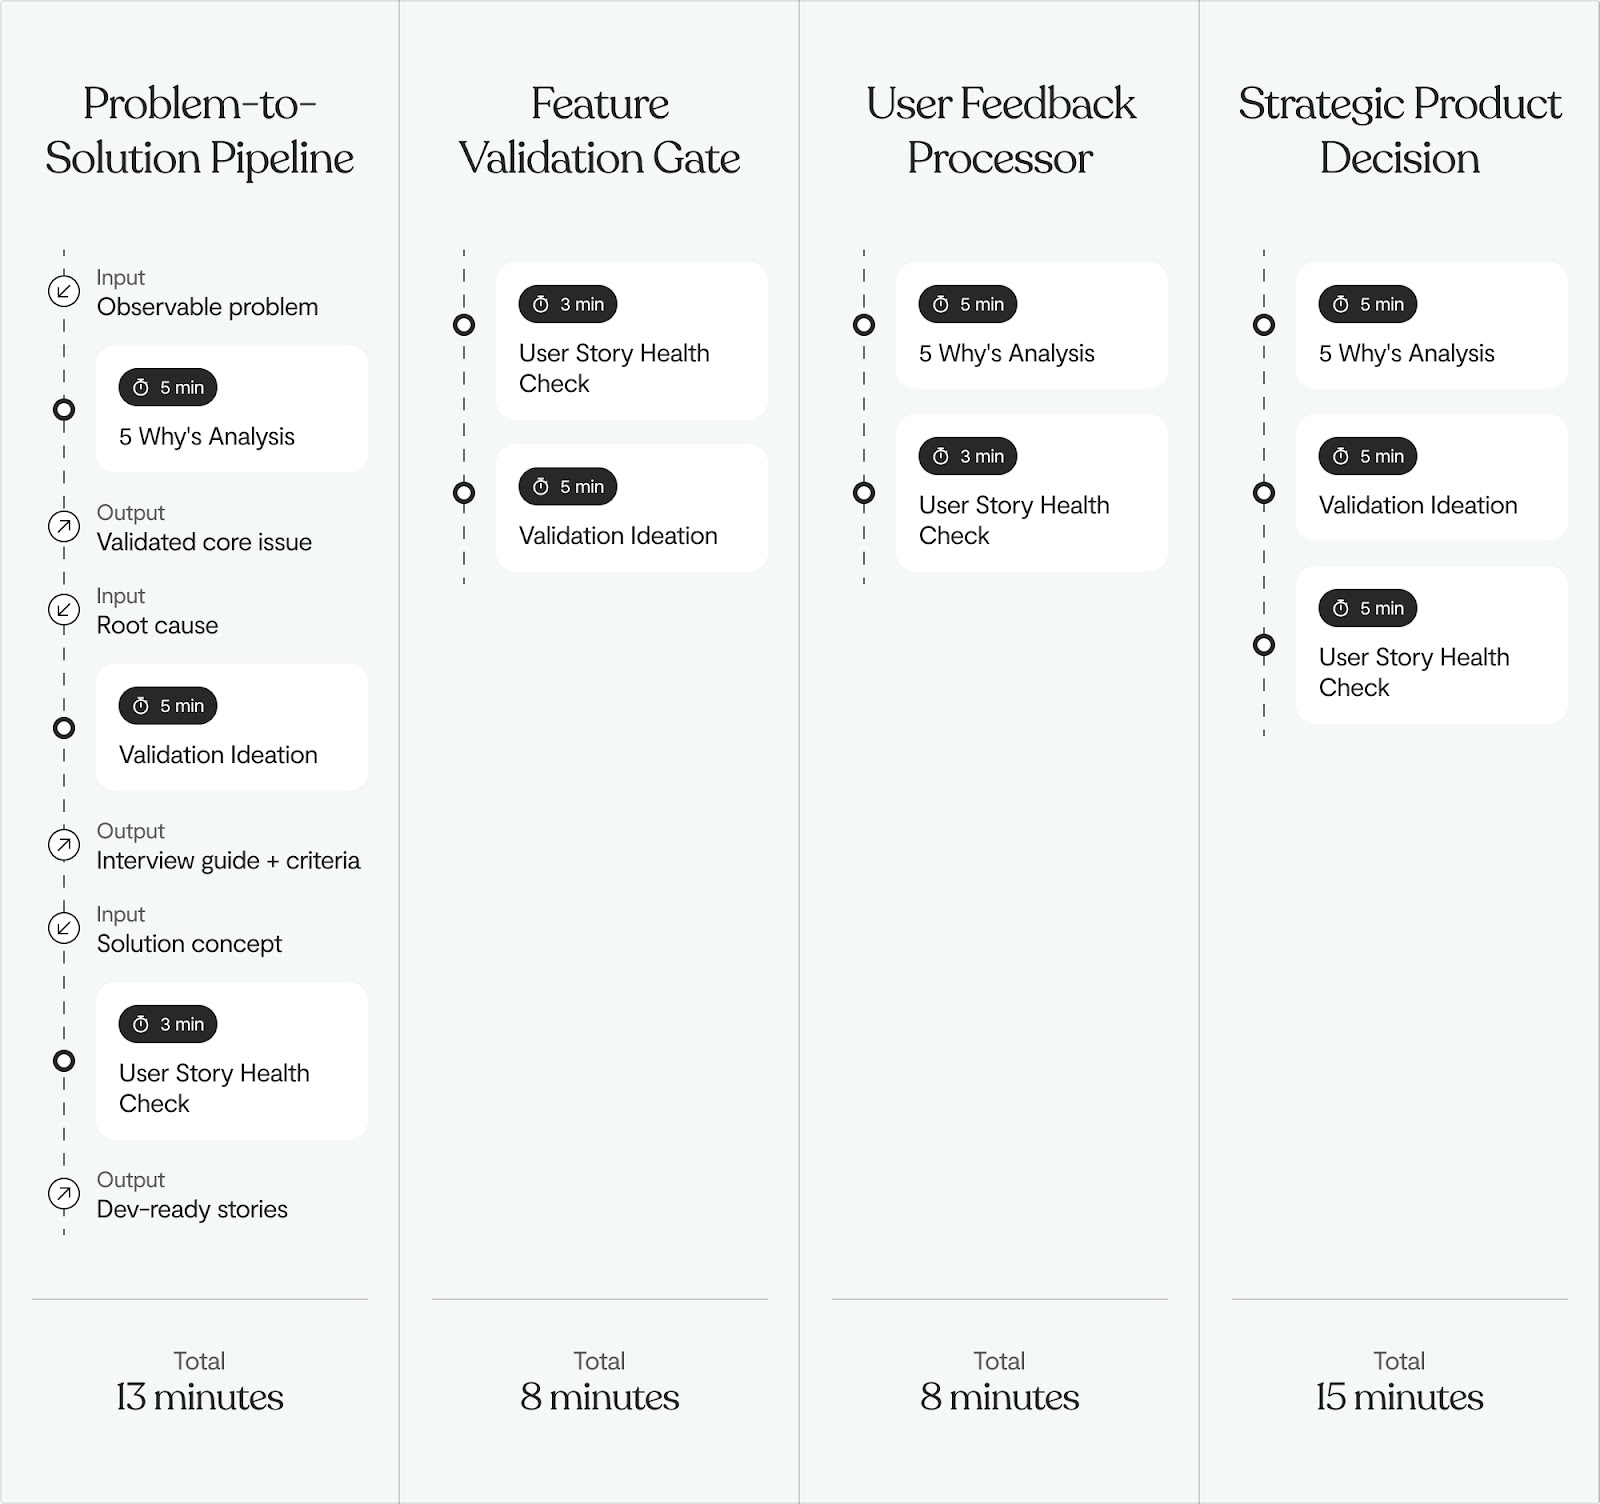
Each workflow takes 8-15 minutes and replaces hours of internal debate.
Pick the workflow that matches your current situation, follow the steps, and get clarity fast.
👋 Who we are and why we built this
We're Lumi Studio – a UX-focused digital product studio that's helped startups design, build and take to market some seriously good products.
Over the past decade, we've seen brilliant startups crack the code: systematic validation turns great ideas into products users can't live without.
Here's what we noticed: These founders listened to users, not just their own intuition. They turned product development into a systematic practice, not a series of expensive experiments.
So we built these AI tools to democratise that process.
We're sharing this because we believe every startup has the potential to build something users genuinely love. When founders validate systematically instead of building on assumptions, they create products that truly change lives.
Head to our AI Tools page and start with your biggest current product challenge.
📋 Pick your workflow
Workflow 1: Product metrics declining
When your product metrics are heading in the wrong direction
When something's broken in your product, the natural instinct is to start brainstorming solutions immediately. But if you don't understand what's actually causing the issue, you'll end up treating symptoms instead of the root cause.
This workflow takes you through a systematic diagnostic process that reveals the root cause, validates your understanding with real users, then structures the fix as development-ready requirements. It's designed to turn product crises into learning opportunities that strengthen your product long-term.
When to use this workflow:
- User complaints increasing
- Key metrics declining
- Features underperforming expectations
- Post-launch damage control needed
The process:
Step 1: 5 Why's Analysis ⏱️ 5 minutes
Here's something teams get wrong a lot – they stop at the first explanation they find.
"Users aren't completing onboarding because it's too long." But why is length the problem? Maybe it's not about time at all – maybe users get confused at a specific step, or the value proposition isn't clear, or they're the wrong users entirely.
The 5 Why's process forces you to dig deeper until you hit the actual root cause.
- What you input: The observable problem (metric drop, user feedback)
- What happens: AI guides you through systematic root cause analysis
- What you get: The real issue behind the symptoms
Step 2: Validation Ideation ⏱️ 5 minutes
Now that you know what you think is wrong, you need to prove it.
This step creates a focused validation plan that tests your root cause hypothesis with real users.
Instead of asking "What do you think about our onboarding?", you'll have specific questions that confirm or challenge your diagnosis. The AI helps you design validation that actually validates – not just confirmation bias in disguise.
- What you input: The root cause you just identified
- What happens: Generate a targeted validation strategy
- What you get: Interview plan with clear success criteria
Step 3: User Story Health Check ⏱️ 3 minutes
Once you've confirmed the real problem, this tool helps you structure the solution as user stories that your development team can actually work with.
It checks your fix addresses the validated user need while also considering business constraints and technical feasibility. You'll end up with clear, actionable requirements instead of vague "make it better" instructions.
- What you input: Your validated solution concept
- What happens: Optimise for user value and business impact
- What you get: Development-ready user stories
Why we recommend this workflow:
So many product crises stem from building solutions before understanding the actual problem.
This workflow forces you to diagnose first, validate second, then build with confidence. It prevents the expensive cycle of shipping fixes that don't actually fix anything.
⚡ Workflow 2: New feature under consideration
Before you build that "obviously good" feature
This is the workflow that saves startups from their biggest mistake: building features that sound brilliant in team meetings but flop with real users.
This workflow acts as a checkpoint that catches poor feature ideas before they consume your resources.
It takes your initial concept and structures it properly, then creates a validation plan that reveals whether the idea is worth pursuing.
When to use this:
- Evaluating incoming feature requests
- Facing pressure to ship something quickly
- Working with limited development capacity
- Testing "everyone wants this" assumptions
The process:
Step 1: User Story Health Check ⏱️ 3 minutes
Most feature requests come in as solutions, not problems.
"We need a dark mode" or "Users want better analytics."
This step forces you to reframe these as user stories that focus on the underlying need. Instead of ❌"Add dark mode," you get ✅"As a user who works late nights, I need an interface that doesn't strain my eyes so I can use the app comfortably in low-light conditions."
This reframing often reveals that the requested feature isn't the only (or best) way to solve the user's actual problem. ⬇️
- What you input: Feature idea or user request
- What happens: Structure it as user-centered stories
- What you get: Clear, testable value proposition
Step 2: Validation Ideation ⏱️ 5 minutes
Now you have clear user stories, but you still don't know if they're worth building.
This step creates a specific plan to test whether users actually have this problem and whether your proposed solution resonates with them. You'll get interview questions, success metrics, and clear criteria for deciding whether to proceed.
The key is testing the problem and the solution separately – just because users have the problem doesn't mean your solution is the right one.
- What you input: Your structured user stories
- What happens: Create a validation strategy
- What you get: Go/no-go criteria with concrete testing plan
Why we recommend this workflow:
This prevents the #1 product mistake – building features because they sound compelling rather than because users will actually adopt them. Remember: enthusiasm from friends doesn't count as market validation.
💡 Pro tip: If you can't clearly define what success looks like for a feature within these 8 minutes, don't build it yet. This workflow forces that clarity before you write a single line of code.
🔍 Workflow 3: User feedback accumulating
Turn user noise into actionable insights
User feedback is both a blessing and a curse. It's invaluable for understanding what's working and what isn't, but it's often scattered, contradictory, and focused on symptoms rather than root causes.
Users will tell you they want faster loading times when they really mean the interface is confusing. They'll request more features when they actually need better onboarding for existing ones.
This workflow helps you process user feedback systematically, digging past what users say they want to understand what they actually need. It's especially powerful when you have a pile of support tickets, user interviews, or usage data that you need to turn into actionable product improvements.
When to use this:
- Processing user interview results
- Analysing support ticket patterns
- Understanding feature usage data
- Optimising existing functionality
The process:
Step 1: 5 Why's Analysis ⏱️ 5 minutes
User feedback rarely reveals the real problem on the surface. When someone says "your app is too slow," they might mean the loading time, or they might mean it takes too many clicks to complete their task, or they might mean they can't find what they're looking for quickly.
This step helps you dig past the surface complaint to understand the fundamental user need.
➡️ What job is the user trying to accomplish? What's preventing them from getting it done efficiently?
- What you input: User feedback or behavioural data
- What happens: Dig into underlying user needs
- What you get: Core job-to-be-done the user is hiring your product for
Step 2: User Story Health Check ⏱️ 3 minutes
Once you understand the real user need, this step helps you structure solutions as clear, actionable user stories. Instead of ❌"make the app faster," you get specific stories like ✅ "As a power user managing multiple projects, I need to quickly switch between contexts without losing my place so I can maintain my workflow efficiency."
These stories give your development team clear direction and success criteria.
- What you input: The user need you identified
- What happens: Convert insight to actionable stories
- What you get: Feature improvements ready for development
Why we recommend this workflow:
Users often describe symptoms, not root causes. They'll say "I want a dark mode" when they really mean "the interface strains my eyes during long sessions." This workflow helps you build solutions for what users actually need, not what they initially request.
Get free access to our AI tools suite

All three AI tools are completely free. Head to the Lumi AI Tools page to access:
- 5 Why's Analysis – Dig into root causes systematically
- Validation Ideation – Create targeted validation strategies
- User Story Health Check – Optimise features for user value
🎯 Workflow 4: Major product decision pending
For when the stakes are high and resources are on the line
Some product decisions are bigger than others. When you're considering a major feature investment, planning your roadmap for the next quarter, or thinking about a significant pivot, you need more than gut instinct – you need systematic validation from multiple angles.
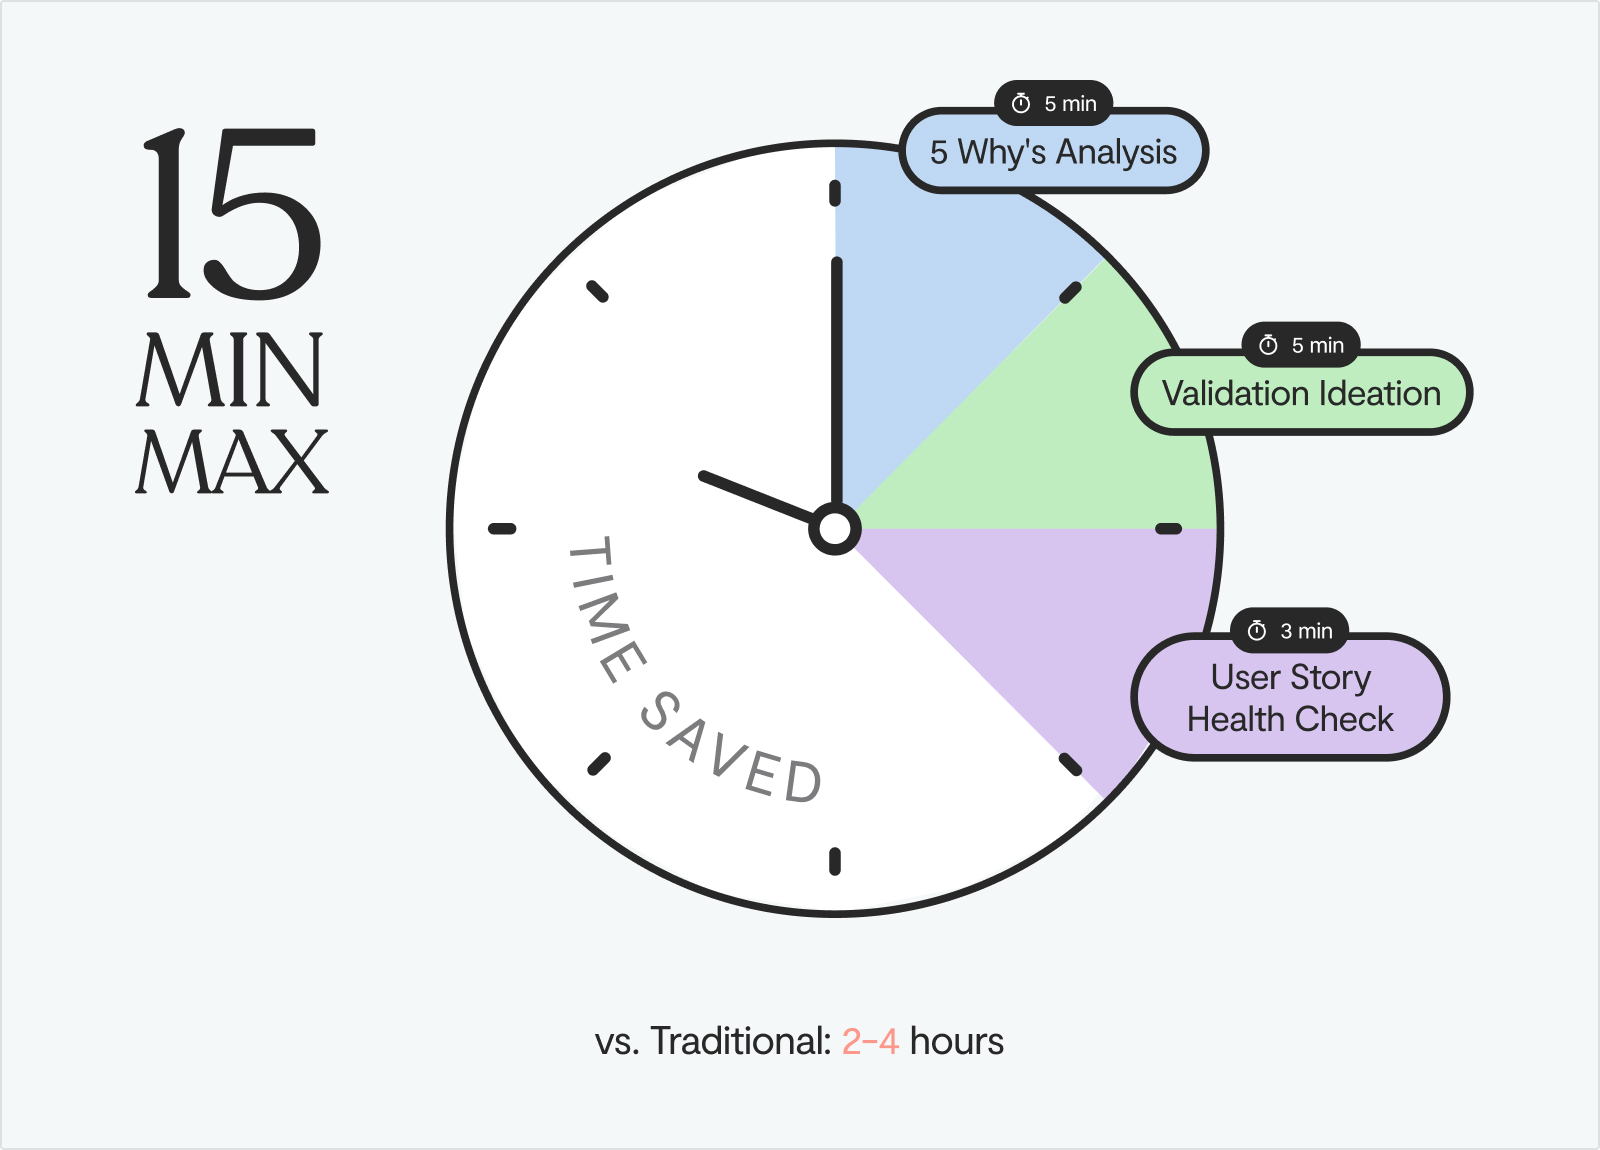
This workflow is a heavy-duty decision-making process. It combines all three tools in sequence to make sure you've thoroughly understood the problem, validated the opportunity, and structured the solution before committing serious resources. Use this when the cost of being wrong is high and you need maximum confidence in your decision.
When to use this:
- Major feature investments (3+ months of development)
- Product roadmap planning cycles
- Significant resource allocation decisions
- Pivot or direction-change considerations
The process:
Step 1: 5 Why's Analysis ⏱️ 5 minutes
Strategic decisions often start with high-level opportunities or challenges: "We need to improve retention" or "We should expand into enterprise." But these statements are too broad to act on effectively.
This step forces you to dig into the specific underlying business need.
➡️ Why exactly do you need to improve retention?
➡️ What specific retention problem are you solving?
➡️ Which user segments are churning and why?
This analysis checks you're solving a real, specific problem rather than chasing vanity metrics.
- What you input: Strategic opportunity or challenge
- What happens: Understand the true underlying business need
- What you get: Clear, validated problem definition
Step 2: Validation Ideation ⏱️ 5 minutes
Now that you understand the specific problem, you need to validate that solving it is worth the investment.
This step creates a comprehensive validation strategy that tests your assumptions about the problem's importance, the target market's willingness to adopt a solution, and your proposed approach's viability. You'll get specific criteria for measuring success and a plan for gathering the evidence you need to make a confident decision.
- What you input: Strategic problem or opportunity
- What happens: Design comprehensive validation approach
- What you get: Evidence requirements with detailed testing plan
Step 3: User Story Health Check ⏱️ 5 minutes
With the problem validated and the opportunity confirmed, this final step structures your solution as detailed product requirements.
You'll get user stories that connect directly to the business problem you're solving, with clear success metrics and acceptance criteria. This checks if your development team understands not just what to build, but why they're building it and how to measure success.
- What you input: Validated opportunity
- What happens: Structure as detailed product requirements
- What you get: Execution-ready specifications with success metrics
Why we recommend this workflow:
Major product decisions require multiple validation angles.
This workflow checks you've validated the problem exists, confirmed market demand, and structured the solution properly before committing serious time and money.
It prevents the expensive mistakes that can derail startups – like building complex solutions to problems that don't actually exist, or pursuing markets that aren't ready for your solution.
4 instant validation hacks
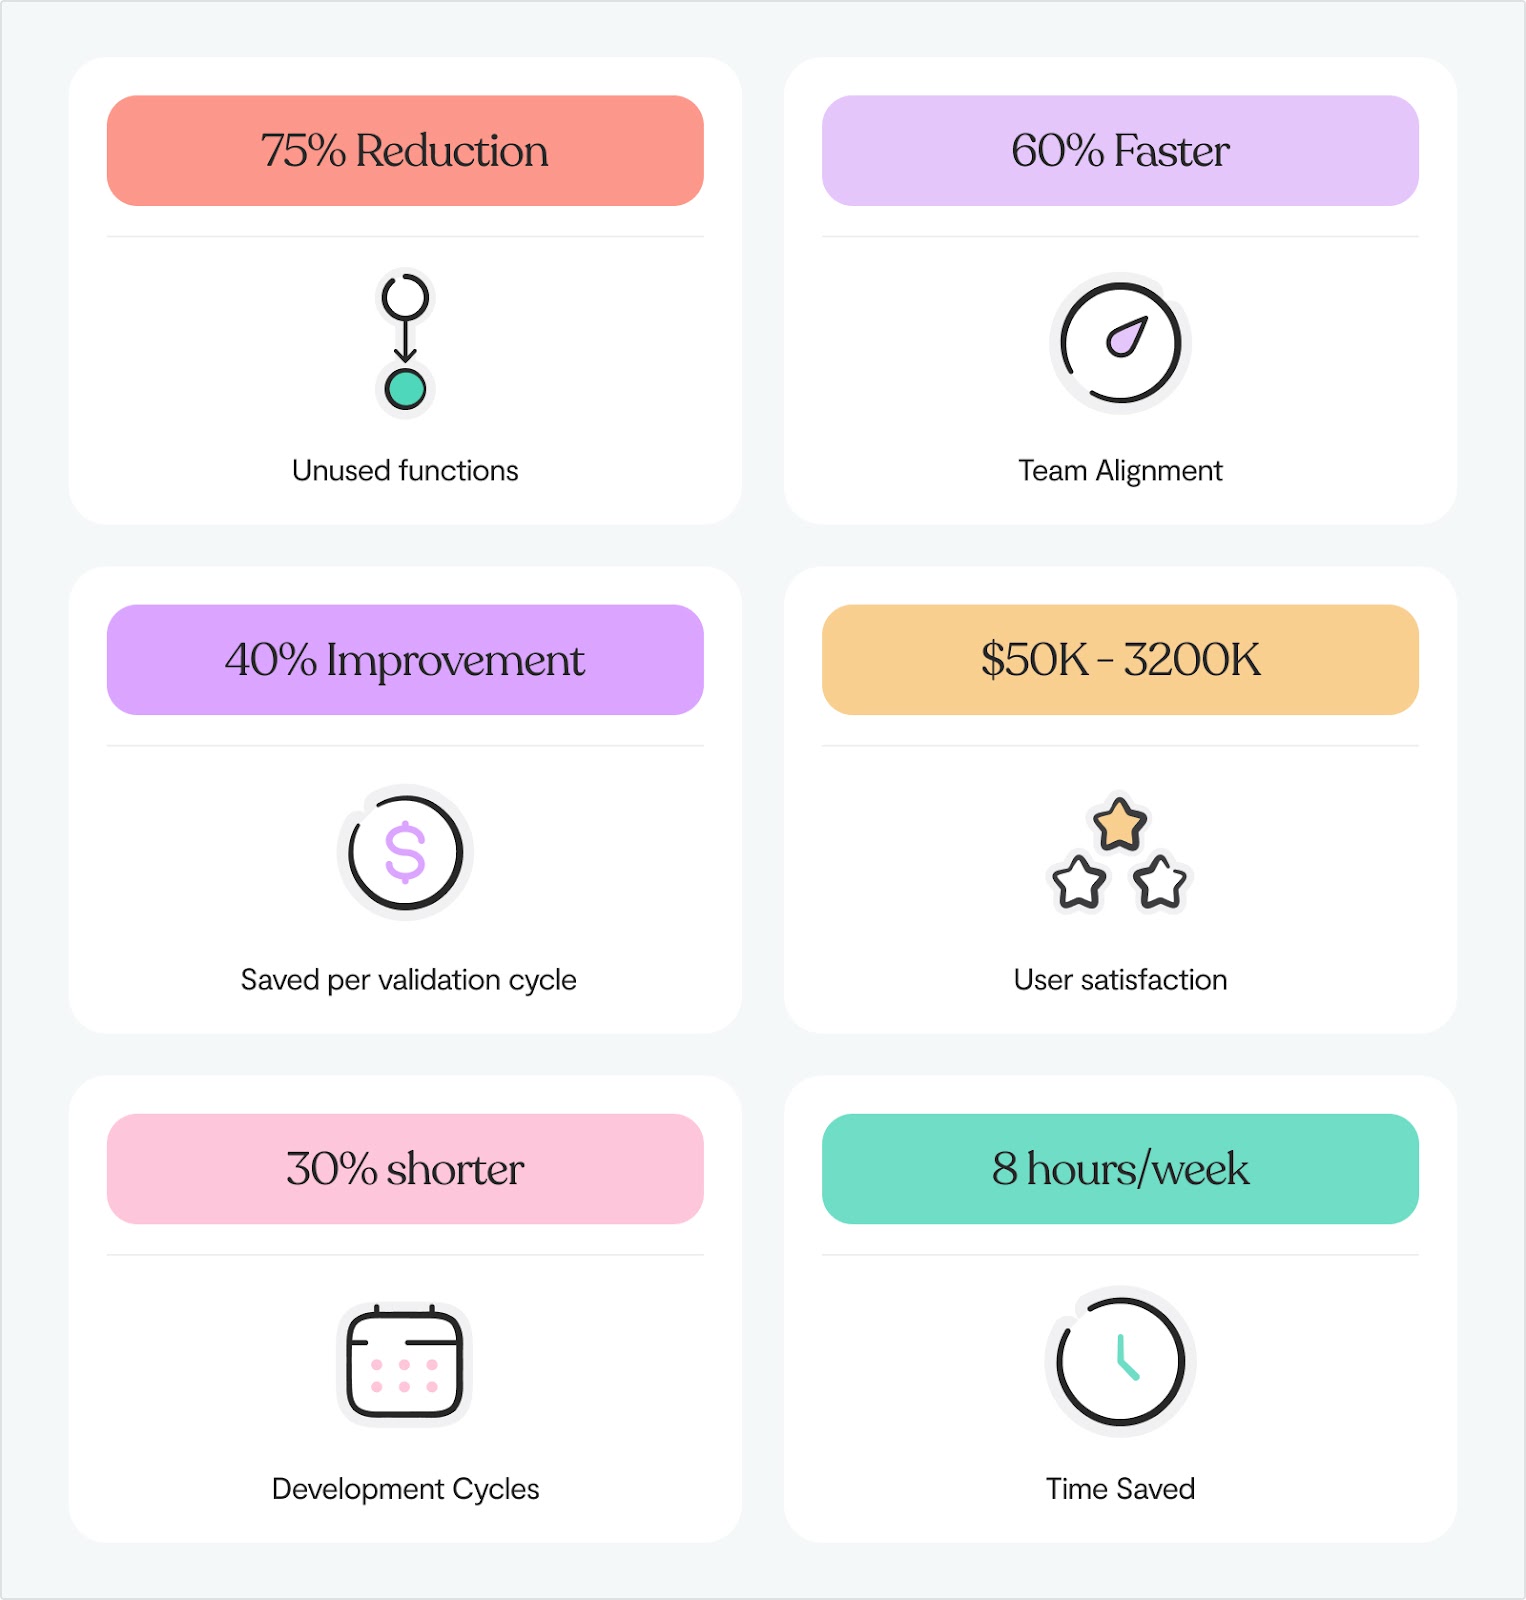
Sometimes you need answers fast. Here are rapid validation techniques you can use while waiting for coffee to brew:
The 60-second reality check
Before any product decision, ask yourself:
- Can I name 3 specific users who have this exact problem?
- Do I have evidence they've tried to solve it before?
- Would they pay money to fix it today?
If you can't answer all three, stop building.
The competitor test
Search "[your feature idea] + app" and "[your feature idea] + tool." If nobody else has built it, that's either brilliant insight or a red flag. Usually, it's the red flag.
The mum test
Explain your feature to someone who doesn't work in tech (your mum, your neighbor, anyone). If they don't immediately understand the problem it solves, your users won't either.
The urgency gauge
Ask potential users: "If this problem disappeared forever tomorrow, how would that change your day?" If they shrug, move on.
🛠 Implementation checklist
If you want to get the most out of these workflows, you can set up the right conditions for success to make sure insights turn into action. Here's how to set yourself up for maximum impact ⬇️
Before starting any workflow:
✅ Define what success looks like for this specific decision
- Write down the specific outcome you're hoping for (e.g., "Increase trial-to-paid conversion by 15%" or "Reduce support tickets about feature X by 50%")
- Identify what would make you confident to move forward vs. what would make you pause or pivot
- Set a clear threshold: "If validation shows X, we build it. If it shows Y, we don't."
- Consider both positive and negative success criteria – knowing when NOT to build something is equally valuable
✅ Identify who will act on the results and when
- Assign a specific person responsible for implementing the findings (not "the team")
- Set a realistic timeline: "If validation is positive, development starts within 1 week"
- Confirm the decision-maker is available to review results immediately after the workflow
- Get pre-commitment: "If the workflow recommends building this, are you ready to prioritise it?"
✅ Block uninterrupted time for the complete workflow
- Put your phone in airplane mode – these workflows require focused thinking
- Close Slack, email, and any other potential interruptions
- If working with a team member, make sure they're equally committed to the time block
- Choose your peak energy hours – decision quality drops when you're tired
- Have the AI tools already open in separate browser tabs before you start
✅ Set a firm deadline for implementing findings
- Choose a specific date for acting on the results, not "sometime next week"
- Calendar the follow-up action immediately after completing the workflow
- Consider your development cycles: align deadlines with sprint planning or roadmap reviews
- Account for validation time if the workflow recommends further user research
- Share the deadline with stakeholders who need to be involved in implementation
After completing a workflow:
✅ Document key insights in your product backlog
- Write a clear summary that someone else could understand in 2 minutes
- Include the specific user problem identified, not just the proposed solution
- Note any assumptions that still need validation
- Record which user segments the insight applies to
- Add tags or labels that connect to your broader product strategy
- Include direct quotes from user research if you conducted any
✅ Assign clear next steps with specific owners
- Break down implementation into concrete, actionable tasks
- Assign each task to a specific person with their explicit agreement
- Include acceptance criteria: "This task is done when..."
- Set dependencies: "Task B can't start until Task A is 80% complete"
- Estimate effort required: "This should take 2-3 days of development time"
- Create calendar reminders for task owners
✅ Set follow-up dates to measure results
- Schedule a specific review meeting 2-4 weeks after implementation
- Define what metrics you'll check and where you'll find the data
- Set up automated tracking if possible (analytics events, conversion funnels, etc.)
- Plan for both quantitative metrics (usage numbers) and qualitative feedback (user interviews)
- Create a simple dashboard or report format for reviewing results
- Prepare a decision framework: "If metrics show X, we'll do Y"
✅ Share learnings with relevant team members
- Send a brief summary to anyone who will be involved in implementation
- Include the reasoning behind decisions, not just the decisions themselves
- Highlight any insights that might apply to other product areas
- Create a searchable record for future reference (wiki, shared doc, etc.)
- Consider sharing anti-patterns: "We almost built X, but validation showed users actually needed Y"
- Schedule a brief team walkthrough if the decision impacts multiple people
Ready to start building stuff your users can’t live without?
Choose the workflow that matches your current challenge and run it in the next 15 minutes. You'll immediately see why systematic validation beats educated guesswork every time.
Need help implementing this approach? Let's chat – we can help.
❓ FAQs
What if validation contradicts my vision?
Your vision matters, but market reality matters more. Consider this a course correction, not a failure. Some of the most successful pivots happened when founders listened to validation over intuition.
"How do I get my technical co-founder to buy into this?
Show them the development time saved. Calculate the cost of building the wrong thing vs. 15 minutes of validation. Most technical founders appreciate systematic approaches once they see the ROI.
Can I use these workflows for B2B and B2C?
Absolutely. The process is the same – only the validation methods change. B2B might use sales call feedback, B2C might use usage analytics.
What if I don't have users yet to validate with?
Start with potential users in your network, online communities, or competitor's users. The goal is understanding problems, not pitching solutions.
How do I prioritise when multiple workflows suggest different directions?
Use the business impact vs. effort matrix. Plot each validated option and choose the highest impact, lowest effort combination first.
Should I run workflows alone or with my team?
Start alone to learn the process, then involve your team. Having 2-3 people in the workflow often improves quality, but more than that creates chaos. Keep the core decision-making group small.
How often should we use these workflows?
Use Workflow 2 (Validate Before Building) for every feature request. Use Workflow 3 (Turn Feedback Into Features) weekly for user feedback. Use Workflow 1 and 4 as needed for problems and strategic decisions.
What if different user segments want different things?
That's normal. Use the workflows to validate each segment separately, then prioritise based on business impact. You might build different solutions for different segments, or focus on the highest-value segment first.
How do I know if my validation sample size is big enough?
For early-stage validation, 5-10 consistent responses often reveal clear patterns. If you're seeing contradictory feedback, you either need more data or need to segment users differently. Quality matters more than quantity.
How do I prioritise when multiple workflows suggest different directions?
Use the business impact vs. effort matrix. Plot each validated option and choose the highest impact, lowest effort combination first. Also consider which option helps you learn the most about your users.


